Gravity bongs are a tried-and-true cannabis consumption method favoured by old school cannabis users. These bongs deliver a powerful and intense hit of THC that may be too much for inexperienced cannabis consumers.

Dr. Greenthumb’s x Stundenglass Gravity Infuser
R11,995.00
Stundenglass Gravity Infuser – Black
R11,995.00
Stundenglass Kompact Gravity Infuser – Black
R11,995.00
Cookies x Stundenglass Gravity Infuser
R11,995.00
These water pipes push smoke directly into the user’s lungs, taking the experience of being high to a whole new level. Although it cannot beat the real deal, crafty consumers can easily make their own gravity bongs at home. This DIY item will ensure a fast delivery and strong hits of your favourite strains.
How To Make A DIY Gravity Bong
You can make a DIY gravity bong using a few household items. In order to make your gravity bong, you will need a:
- Plastic bottle with its cap (any size will do, but a 500 ml bottle is ideal)
- Bucket or a 2 litre plastic bottle
- Sheet of aluminium foil
- Sharp knife or box cutter
- Poking device (like a toothpick)
- Selection of your favourite ground flower (at least one gram)
Making a gravity bong may seem intimidating if you are unsure of where to start, but the process is much more straightforward than one would think. All you need is a bit of creativity and 10 minutes to construct your very own gravity bong.
Step 1: Cut Your Bottles
Take your box cutter or knife and cut off the bottom half of a small bottle. For the purpose of making a gravity bong, you will want to cut off the smallest piece of the bottle as the smoke chamber will be larger, creating a bigger hit.
Next, cut off the mouthpiece of your larger bottle. Make sure that your smaller bottle can fit into the bigger bottle. You can skip this step if you are using a bucket.
Step 2: Make The Bowl
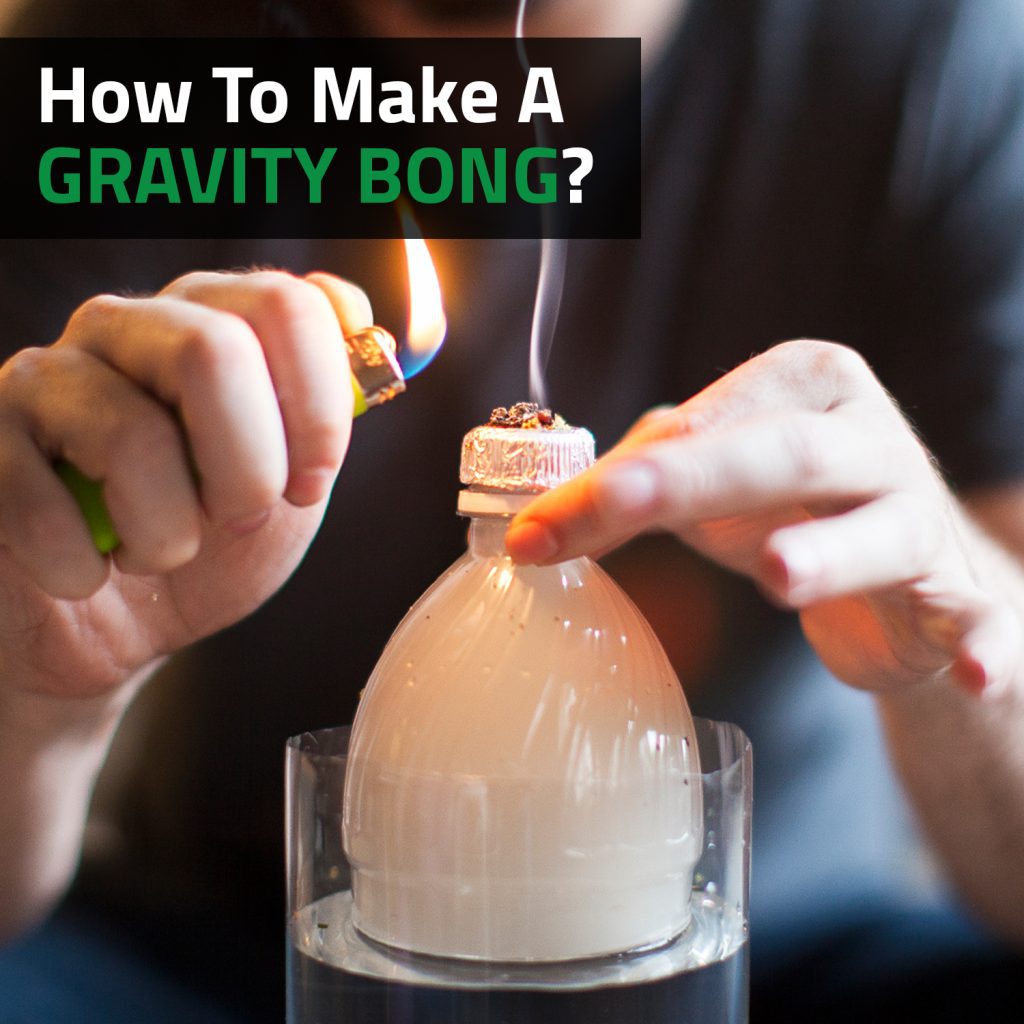
Poke a hole into the bottle cap of the smaller bottle. Try and make it big enough so that your pinky finger can fit through. This will allow you to draw enough air through the bong.
Wrap the cap in aluminium foil and shape it to create a small bowl for your cannabis. Since you will need to screw the cap back on, be sure to fashion the bowl on top of your cap. The deeper you make the divot, the better it will hold your weed.
Use your poking tool to make a few holes in the aluminium foil. You will need around 3 to 5 holes to ensure proper ventilation. Be careful when poking the holes in the foil so that you do not rip it.
You can also skip this step if you just want to use a glass or metal bowl from another smoking device.
Step 3: Prepare Your Gravity Bong
Fill the larger bottle or bucket with water until it is at around 5 cm from the top. Load your DIY bowl with weed, but do not screw it on yet.
Step 4: Submerge The Small Water Bottle
This step is a little tricky, but getting it right is essential. Submerge the smaller bottle so that the open part goes in first. Keep pushing the bottle in until the top of the bottle is about 2-5 cm above water. Then carefully screw your bowl back onto the small bottle.
Step 5: Fill Your Chamber
Light your herbs and slowly pull the small bottle upwards so that it fills with smoke. Make sure that you do not pull it out completely, you should still keep about 2-5 cm of the bottle submerged.
If your bottle is not filling up with smoke, make sure that your cap is fully screwed on and check that there are no holes in the bottle.
Step 6: Take A Hit Of Your Gravity Bong
Once the bottle has filled up with smoke, carefully unscrew the bottle cap and place your mouth over the bottle opening. Gently press the bottle back into the water. As the bottle starts to fill with water, the smoke will get pushed into your lungs.
Since the smoke has been filtered through water, your hit will be smooth and cool, but still provide a potent hit of THC. However, gravity bongs are known to make even the most experienced users cough, so be sure to proceed with caution.
How Often Do I Need To Change The Foil In My Gravity Bong?
You do not need to worry about changing the foil in your gravity bong unless it has started to rip or the air holes become clogged. Otherwise, you can keep reusing the foil.
Will I Get Higher From A Gravity Bong?
Since gravity bongs have larger chambers than regular bongs, each hit contains a much larger amount of cannabis smoke. Additionally, the process of forcing heavily concentrated smoke directly into your lungs adds to the intensity of your flower’s effects.
Are Water Bottles Safe To Use In A Gravity Bong?
Most homemade bongs are made with single-use plastic bottles. These contain polyethylene terephthalate (PET), which has the potential to release chemicals when heated – similarly to water bottles that have been left in a hot car that can cause the water to taste odd. You will probably pull these chemicals into your lungs when you heat up your DIY gravity bong.
However, there is still no conclusive evidence on what this may do to your health. This is why most cannabis consumers prefer using glass or silicone bongs to avoid the ingestion of potentially harmful chemicals produced by plastic.
Nothing Can Beat The Real Deal
A DIY gravity bong is a fun little project for those who enjoy crafting, but ultimately, nothing will be able to beat a real, specially crafted gravity bong. These gravity bongs are easy to use and prioritise a safe and fulfilling experience. Choose your favourite colour scheme and enjoy your gravity bong in style with Stundenglass – the leaders in the game when it comes to gravity bongs:
- Stundenglass Gravity Hookah – Black
- Dr. Greenthumbs x Stundenglass Gravity Hookah
- Cookies X Stundenglass Gravity Hookah

Cookies x Stundenglass – Hose Assembly
R1,250.00-
Cookies x Stundenglass Gravity Infuser
R11,995.00 
Stundenglass – Hookah Bowl Assembly
R1,385.00
Stundenglass – Hookah Hose
R425.00
Making your own gravity bong can be very economic and fun, especially if you are a crafty person who wants to try out every aspect of cannabis consumption. A DIY gravity bong is very easy to make and can provide you with a strong hit and the full experience of your favourite flower. However, you will get healthier and better results with a real gravity bong, so once you have gotten your use out of your DIY gravity bong, it is definitely worth it to make the switch to the real deal.